Introduction
This time we want to show you how to quickly add very simple form validation using VUE.js – without knowing this library 🙂
Case: We want to add simple but dynamic validation for one of the Bootstrap forms.
Conditions/assumptions:
- we cannot rewrite everything with React,
- we don’t have much time and need to work with an existing HTML code,
- it supposes to be a simple frontend addition – not rocket science,
- we know that VUE.js exists.
Step 1: Read the documentation (or a crash course)
It’s always a good place to start.
Project page: https://vuejs.org/
Official documentation: https://vuejs.org/v2/guide/
Polish crash course: https://typeofweb.com/2018/06/08/wprowadzenie-do-kursu-vue-js-od-podstaw/
English course: https://laracasts.com/series/learn-vue-2-step-by-step
Step 2: Describe the feature
We want to:
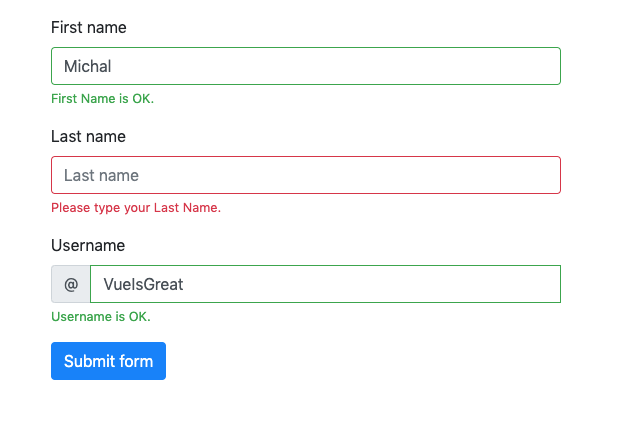
- validate three fields: firstName, lastName, and userName – this will be our models,
- have a couple of requirements for every field (e.g. minimal length),
- show only one error message – even if more requirements aren’t meet,
- show a success message for a given field if all rules are passed,
- clear validation result after a field is focused,
- display all error/success messages only after the form was sent,
Step 3: Add VUE.js files to the page
Basically, we can copy the code from docs mentioned before.
<script src="https://cdn.jsdelivr.net/npm/vue"></script>
Step 4: Create the VUE.js application
It’s a good idea to follow the MVC pattern. Models and Controllers will be defined in the app, and for the View, we will update the existing HTML structure.
We already defined models: firstName, lastName, and userName. Additionally, we want to have a placeholder for valid/invalid messages.
var app = new Vue({
  // mounting point
  el: '#Form',

  // defined models / variables
  data: {
    // basic models
    firstName: 'Name', // you can set default values here
    lastName: '',
    userName: '',

    // messages
    validation: {
      invalid: {
        // will be set by validate method; example content:
        // [model_name]: 'message',
      },
      valid: {},
    },
  },

  // defined methods
  methods: {
    validate: function () { /**/ },
    clearValidation: function (field) { /**/ },
  },
});
Step 5: Add VUE directives to the HTML code
Models defined – let’s update our View part now. Pay attention to all attributes starting with “v-“.
Make validation results visible only if the given message is defined:
v-if = condition – show given tag only if condition is meet
{{ variable.name }} – show given variable (must be regiesterd before – in loop or data section in Vue app)
<div class="valid-feedback">Hardcoded positive validation information</div>
<div class="invalid-feedback">Hardcoded negative validation information</div>
after:
<div class="valid-feedback" v-if="validation.valid.firstName">{{ validation.valid.firstName }}</div>
<div class="invalid-feedback" v-if="validation.invalid.firstName">{{ validation.invalid.firstName }}</div>
Define models
v-model = modelName – attach model to a form control (two-way data binding)
v-bind : attributeName = attributeValue – calculate and assign attribute value to the HTML tag (v-bind part can be removed to use shorter version :attributeName=…).
v-bind : class = { className: condition, … } – notation like JS object; apply given class name if the calculated condition is true.
v-on : eventType = handler – attach an event handler for event of type eventType handled by handler. Can be an expression or function defined in methods section of Vue app.
<input (...) v-model="firstName" v-bind:class="{ 'is-valid': validation.valid.firstName, 'is-invalid': validation.invalid.firstName }" v-on:focus="clearValidation('firstName')">
Define validate and clearValidation methods.
To access model and defined variables simply use this.<variableName> notation.
(...)
validate: function () {
  if (!this.firstName) {
   this.validation.invalid.firstName = 'Please type your First Name.';
  } else if (this.firstName.length < 2) {
    this.validation.invalid.firstName = 'First Name should have min. 2 characters.';
  } else {
    this.validation.valid.firstName = 'First Name is OK.';
  }
(...)
}
Note that VUE is handling the state of defined variables using shallow comparison (fast but not accurate).
Because we’re changing model really deeply (this.validation.valid.firstName) we need to inform about that by using this.$forceUpdate();
clearValidation: function(field) {
  this.validation.valid[field] = '';
  this.validation.invalid[field] = '';
  this.$forceUpdate();
}
Step 6: Summary and… homework
That’s all. After adding a couple of lines the magic of VUE.js just works.
You can find an example working code on CodePen: https://codepen.io/michalzieba/pen/gNwqVx
Here you can find a quick comparison with Angular and React: https://medium.com/@TechMagic/reactjs-vs-angular5-vs-vue-js-what-to-choose-in-2018-b91e028fa91d
For the homework you can think about upgrading the script:
- display every possible error message for a given field using a v-loop,
- the same but with displaying joined messages generated by the defined method (e.g. {{ showErrorMessagesFor(<fieldName>) }} ),
- create a component to handle simple input with validation,
- write a simple form generator from a defined data structure.
Was chatting with my buddy about finding a good way to watch the MMA fights, and he mentioned selcuksportshd24. Said the quality was decent. I’ll give it a shot I guess. selcuksportshd24
456bet1, gonna try my luck here. Hope the site is user-friendly and pays out quick! 456bet1
Who doesn’t love bonuses? bonos777vip looks like a great place to find ’em! If you’re hunting for some extra perks, def head over and take a look. Get all the bonuses you could want at bonos777vip.
Yo, mk7k’s got a decent selection. Been kicking around there for a bit. Nothing crazy, but solid for a casual spin now and then. Check it out at mk7k.
Okay, 888rioapp, you have my attention. The app looks slick, and I’ve heard the payouts are pretty fast. Downloading now, wish me luck! Fingers crossed for some quick wins. You can find the app at 888rioapp
GYBET bonus? I signed up and the bonus was pretty sweet, gotta admit. The wagering requirements were reasonable too. Worth a peek if you’re looking to start with a little extra. See their bonus at gybetbonus.
It’s fascinating how platforms like bet 100 slot use data – even verification rates (94.7%!) – to shape the user experience. The quick ID checks & payment options (GCash is popular!) seem designed for seamless engagement, which is key for sustained play. 🤔
An app, eh? Is the vn23app any good for mobile gaming? Gotta be smooth and not drain my battery in 5 seconds. Mobile players, your thoughts? Might download it to try at vn23app.
WinpotDeportes looks pretty sporty aye? Lots of sports betting options, from the looks of things. If you’re into that, give it a look over: winpotdeportes
Had a quick peep at OneCasinoNL, seems like a decent online casino. Worth checking out if youre looking for a new place to spin those reels. Heres the link if you fancy a peek: onecasinonl
This deep dive into Vue validation highlights a crucial point: robust front-end validation isn’t just about code; it’s about seamless UX. In high-stakes environments, like processing transactions or even accessing a x777 live casino, immediate, non-intrusive feedback is paramount for user trust. Great architecture makes the complex feel effortless.